design

Showing posts with label watercolour stamping. Show all posts

Saturday 15 January 2011

Not everyone wants sweet

There has been a rash of beautiful, sweet cards lately and I've not been left out myself, but, not everyone wants sweet. This card, I think is the anthisis of sweet, but it is a card for a man and you can't send sweet to a man.
Apologies for the slightly skewed photograph, I don't know what I'm doing lately. It's all straight on the card, I promise.

He is Hypertension Harold and he comes from the wonderful stamp company, I Brake for Stamps.

If you want him ---- come and get him here.

I've entered this card in the Sketch Saturday challenge 138

Thursday 6 January 2011

One of the Best Stamps Ever!

This stamp is one of the best ever. I don't say that lightly as I have lots of good stamps but this one is the one that attracts the best audience when I take it to the shows so here she is in all her glory and I love her to bits. This time I decided to soften the image a little by using pinks and flowers but the sentiment really sums her up. I haven't made a card with her in a long while, but I have now!
I made an easel card for her as I think that she should be seen at all times.
I'm entering her in the Cute Card Thursday's challenge 146 - Out With the Old

Monday 20 December 2010

Fit Fairy for a challenge

Don't you just love this Fit Fairy? She is one of the series of fairy rubber and digital stamps from Craft Fairy and she fits in with this sketch perfectly. The challenge is Sketch and Stash challenge 51.
I used the sketch from Sketch and Stash catalogue as the layout. You can see it below. The challenge is to use any of the sketches from the last year and this is my choice.
To make this card, I used:
Universal twill ribbon in willow green
Happy crafting.

Sunday 19 December 2010

Calling all gardeners.

I bet that this awful weather has upset a lot of would be gardeners. The cold has frozen the earth and stopped them all from going outside to get on with the winter work. To compensate for that I’ve made this humorous card for the gardeners in your life. Go on, give them a laugh.


To make the card you will need:
Big Daddy stamp from I Brake for Stamps. This can be bought here at Craft Fairy.
Art and Graphic pens to colour up the stamp.
A selection of papers to layer up the card
Foam pads to stick on the layers
Glue
Grosgrain ribbon which is available form Craft Fairy
Eazi-score board for making the perfect crease on your card.

I'm entering this card in the Sketch Saturday challenge. So wish me luck.

Sunday 5 December 2010

A Birthday Card for my Grandaughter

It's almost birthday time for my youngest grand daughter and I decided to get in early with her birthday card. I chose the gardening fairy for her as my littlest granddaughter may be only three but she really loves gardening. She also loves the flowers that I drew with the Kuretake pens so I decided to make a card that combines the two things that she really loves the most. Except me that is!

What you will need:
1 base card, 140mm x 140mm
Gardening Fairy Unmounted rubber stamp
Zig Kuretake tut pens in colours: 207 (for skin) 50 for stems and a variety for the fairy,
a saying.
Baby pink and pure pink Kuretake calligraphy blending pens
6 mm green gingham ribbon

This card is easy peasy to make.
Draw the flowers (see the 'Quick and Easy guide to drawing flowers with pens)
Put a strip of double sided sticky tape across the base of the card and stick the ribbon on to the card. Add a bow to the ribbon.
Stamp and colour the fairy, cut it out and use some foam pads to stick it to the card.
Add your desired sentiment and doodle around the edge of the card.
Finished.

Wednesday 24 November 2010

Snowman and Holly for Christmas

Over the last couple of years it seems that Christmas has been geting colder and there have been far more snowmen around so the theme for this year's Christmas cards has to be: Snowman and Holly.
I decided to make it with some of the new ribbon that arrived with Craft Fairy last week.


To make this card you will need:

Snowman with checkered scarf rubber stamp from the Merry Stamper range on the Craft Fairy site.
Holly leaves
Candy Cane Christmas ribbon
Art and Graphic pens by Zig, Kuretake in colours 29 and 50
Some vintage Doodlebug paper : Jolly Holly stripe
Kuretake Calligraphy pen in silver for the border of the image and the card.
Stazon in Stone grey
14 cm x 14 cm base card in white plus extra for the stamped image
Foam pads
glue
Double sided tape

To make the card
Stamp (with Stazon), and colour your image on a spare piece of white card.
Edge the card with the silver calligraphy pen
Stick a piece of Christmas paper onto the bottom of your card.
Tie an esy bow in the ribbon and use the double sided tape to attach it to the card.
Attach the image and the holly leaves to the card with foam pads. Attahc a button to the holly leaves.
Draw a dot dash pattern on the edgeof the card as seen.
As an extra advantage I decide to enter it into the let it snow, Simon Says Challenge and the Paper Take Weekly challenge for Cut it Out.

Friday 12 November 2010

Read My Lips Lucille

I just had to make a card out of this fabulous stamp, Read my Lips Lucille. I've had her for a while, but I really wanted a good saying to go with her. I found the one that I've added here and neadless to say, I'm over the moon. The stamp is on sale at my Craft Fairy site and it is made by the wonderful Della from I Brake for Stamps. Her Humerous Senior range is the original and the best too.

What you will need:
1 base card, 140mm x 140mm
Contrasting card for layering
Read my Lips Lucille stamp
Zig Kuretake tut pens in colours: 207 (for skin), 56, 23, 49
A button for the corner
A saying.
Feel free to copy the one that I've used. I printed it out on the computer, cut it out and layered it up.
16mm scarlet satin ribbon for the centre of the card.

I really didn't think that this lady needed my usual pinks so I went for no nonsense colours, but because it is nearly Christmas I added some reds too.

Thursday 21 October 2010

Super fun Christmas

This is a card for the grumpy old ladies in us all.

Are you all getting ready for Christmas? If you are then here’s a rather different card for you to make this month. It’s a funny one for a change.


You will need: 1 base card 140mm x 140mm,
I used white linen card.
1 piece of white card 1 piece of red card
1 piece of doodlebugs jolly holly paper
1 length of 9mm red saddle stitch ribbon
1 sentiment and the package lady stamp from the 'Censorship' sheet of unmounted rubber stamps.
Stazon in Stone Gray
A selection of pens to colour the image.
H2O waterbrush from Kuretake.
paper glue 3d foam pads.

To make the card Stamp the image onto a piece of white linen card. Colour it in and trim the card to leave a fairly generous border around the image. Stick the image card to the red card and trim to leave a thin border. Stamp the sentiment onto another piece of white card and mount onto red card and trim to leave a similar size border. Cut a piece of jolly holly paper to cover about a 1/3rd of the card and stick to the base card. Tie a knot in the ribbon and use it to cover the join. Stick the images to the card with 3d foam pads.

Thursday 23 September 2010

A break from the norm

Cards for men are always so difficult to find so this should really help you all out. It's not the usual pretty card that I bring to you today, but a real bruiser of a card with a clear man sized message.


Don't you think that this will make a perfect card for the man in your life?

If you want to make it then you will need a 140mm x 140mm base card
Some man coloured paper
The Hypertension Harold Unmounted rubber stamp
Stazon in Stone Grey
Kuretake Art and Graphic pens Nos 260, 71, 8, 82.
Water pen.

The rest is up to you.

Tuesday 9 March 2010

Challenge 82 - Kids Kardz!

I know that I don't very often make cards for boys but this time I'm making the exception because it lets me use this great stamp from the Kids Collection by The Merry Stamper.


This card was made for

Challenge 82 - Kids Kardz!

on My Time to Craft.
This fab boy stamp is from the set of Sketch kids stamps from The Merry Stamper.
I also used some of our highly desired dinosaur ribbon.
Some Kuretake Art and Graphic, double ended pens for the colouring and a waterbrush for the shading.
I do hope that you like this effort as I know what a pain it is to make cards for boys and I hope that any slug hunter that gets it will love it too.

Saturday 16 January 2010

Stained Glass window card

Stained Glass window card is my choice for the latest challenge on Our Creative Corner. They have a challenge for blue and green so I thought that this fitted the bill really well. I made it some time ago but I was keeping it for something special and this challenge really is something special.
I wanted to be the first to enter. I really get a kick out of that. So silly, I know but indulge me.

Now, don't be fooled into thinking that I've put on any stitching. It's dots made with the pen. Quick and simple. Makes up for the age that I took to colour in the stamped image.

I know that you are going to want to buy it immediately so go to Craft Fairy now to get it. It's the beautiful Stained Glass Flower stamp.

Tuesday 5 January 2010

A Spoonful of Sugar Challenge 85 Hearts

The latest challenge on a Spoonful of Sugar is for Hearts so I just had to use this really cute stamp to make a card.

This card shows you that love is not for the exclusive use of the young and I think that it is so sweet.
I used the Flaunt It sheet from I Brake for Stamps that was feartued in 'Quick Cards Magazine' last year,
So, if you already have this then get on with the cards. Valentine's Day is on the horizon.

Favourite colour combo

This challenge from Everybody Art challenge 72 is no hardship as I'm only too delighted to make a card in my favourite colours. Who isn't? So off we go with....

A pink card!!!

To make this card I used my stash papers but the cute little stamp is one of my favourites too. It's a silhouette stamp but as you can see, I've used colours on it to give it definition. Pinks natch.

This is the stamp in the raw and it can be bought by clicking on the image.


Tuesday 15 December 2009

Anything Goes

'Anything Goes', That's the challenge on Creative Card Crew this week and it's really opportune as I've grandaughter number 2. She is small and cuddly and just love small animals and soft toys. So this is for her and it fits the theme too.

The card is made using:

Mouse with sign stamp

Pink Florella ribbon

Basic Grey paper that I had in my stash

the border is punched with a Fiskars border punch and the

circle is cut with a nestabilities die.

Happy crafting.

Monday 14 December 2009

Poinsettia Card for Christmas

When else you might ask, but all will be revealed later on in the year when I show you how to use a poinsettia stamp that is not for Christmas. Today, however, I've decided to use this lovely stamp in the Red and Green challenge

I know that I've made red and green cards already but this one is really traditional so here are some details as well as the card.

All items linked below are available from Craft Fairy.


Happy crafting.

Saturday 12 December 2009

Champagne Pearl

Today's challenge on Allsorts is for Pearls and Swirls so I thought that this card of the lovely stamp Champagne Pearl was perfect.


The card is made with a fab stamp from I Brake For Stamps and you can get her by clicking the image below:


Saturday 21 November 2009

Allsorts challenge week 28

Allsorts challenge week 28 is an inspirational one entitled

Christmas carol or a song title....!

What more could one ask at this Christmas time so I've entitled mine
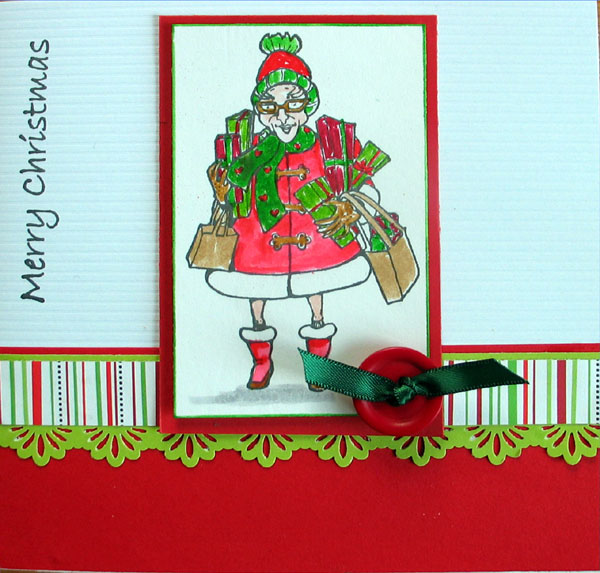
Mistletoe and Wine

Readers, please note that she's holding the Mistletoe and she's already been on the wine.

I know that you are going to want to make this card so you will need the Mrs Santa stamp to get yourself going.

I also used the fabulous and now 'seen on tv' Art and Graphic pens from Kuretake. Colours used. 2, for the dress, 207 for the skin and 50 for the mistletoe.

The lace border was punched with a fiskars border punch.

The Merry Christmas is a stamp from I Brake foe Stamps.

The green and white paper is Jolly Holly dotted lines from Doodlebug.

Now get on and make the card by:

Cutting a base card 150cm x 150cm. I used white card for this.

Cut a strip of heavy red paper and adhere to the bottom third of the card.

Punch a lace border with the Fiskars border punch and layer over the red paper and adhere.

Layer on a strip of Jollyt Holly dotted lines paper and adhere.

Stamp the Mrs. Santa stamp onto white card and colour in with the Art and Graphic pens.

Mount on to Red card and adhere to the base card as shown.

Stamp the sentiment down the left hand side of the base card.

Punch out some circles of card and stick to the base card as shown.

Thread a red button with some green satin ribbon and tie in a knot. Adhere to the base card with foam pads.

Thursday 19 November 2009

Humorous Senior Christmas Card

The Challenge today on Charizma Cards is a sketch and as I've been making Christmas cards recetly, this seems to be the logical thing to do.

This hilarious image is from one of our ever popular stamp sheets that can be bought by clicking on the image of the sheet below.
Merry Christmas to you all.

Tuesday 17 November 2009

Snowman card from our new stamps

We have a set of fantastic new stamps in the online Craft Fairy store and I've made a card from just one of the little snowmen. He is just the perfect size for an A6 card and I'm sure that you'll love him too.

To make this card you will need the snowman stamp which at only £3 is a super bargain.

Some of our dotty red satin ribbon.

I also used Doodlebug paper from my stash and Kuretake pens to colour up the stamp.

Sunday 15 November 2009

Thank You Card for Pink Elephant Challenge

I hope that I'm not the last one to enter this challenge. Better late than never though for the 'Thanks' challenge on the Pink Elephant blog.

This card is made with a stamp from the Cartes Postal sheet that I love so much.